If you have ever wondered what makes a steakhouse meal feel so indulgent and memorable, the answer often comes down to one thing – the butter. This Outback Steakhouse butter recipe recreates that rich, velvety, restaurant-quality butter right in your own kitchen using just two simple ingredients.
Whether you are slathering it on a warm dinner roll, melting it over a sizzling steak, or spreading it on freshly baked bread, this steakhouse butter delivers a luxurious, creamy flavor that elevates every bite.
The best part? No fancy equipment or culinary training required. With cold heavy cream and a pinch of salt, you can make a batch that rivals anything served in a five-star restaurant.
What Does Outback Steakhouse Butter Taste Like?
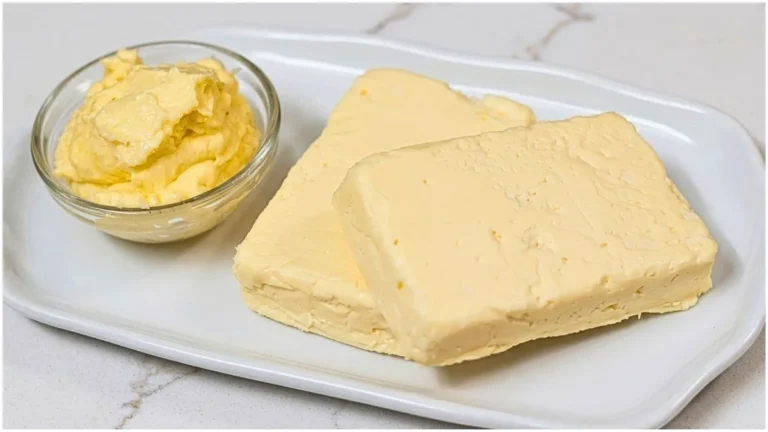
This homemade Outback butter is deeply rich, clean, and satisfyingly creamy with a beautifully balanced saltiness that never overpowers. The texture is dense yet smooth – firm enough to hold its shape when chilled, but it melts luxuriously on warm food.

The aroma is fresh and milky with a subtle, natural sweetness that hints at the pure cream it was made from. Unlike store-bought butter, this version has a noticeably fresh flavor with a silky finish.
It is simple, honest, and absolutely delicious – the kind of butter that makes you pause mid-bite and reach for another piece of bread.
Outback Steakhouse Butter Recipe Ingredients
Gather all the following ingredients, before you start making this Outback Steakhouse Butter
- 4 cups cold heavy cream
- ½ teaspoon salt
- Cold water (as needed, for rinsing)
Kitchen Tools / Utensils List
- Large mixing bowl (chilled in freezer beforehand)
- Hand mixer, stand mixer, or high-powered blender
- Plastic wrap (optional, to prevent splashing)
- Fine mesh strainer or cheesecloth
- Two clean bowls (one for buttermilk, one for rinsing)
- Airtight container or butter mold for storage
Preparation and Cooking Time
Preparation Time: 10 minutes
Mixing / Processing Time: 15–20 minutes
Total Time: 25–30 minutes
Servings: Approximately 1 cup of butter (8–10 servings)
Outback Steakhouse Butter Recipe Step-by-Step Instructions
Follow these clear, straightforward steps in order – each one builds on the last, so take your time and enjoy the satisfying process of turning simple cream into beautiful homemade butter.
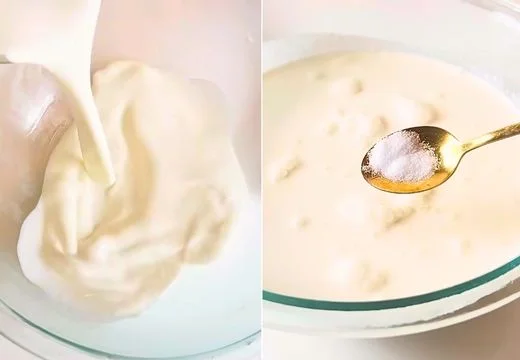
Step 1: Chill the Bowl and Add Ingredients
Place your mixing bowl in the freezer for about 10 minutes. This helps the cream thicken faster and gives better results. Once chilled, pour 4 cups of cold heavy cream into the bowl and add ½ teaspoon salt.
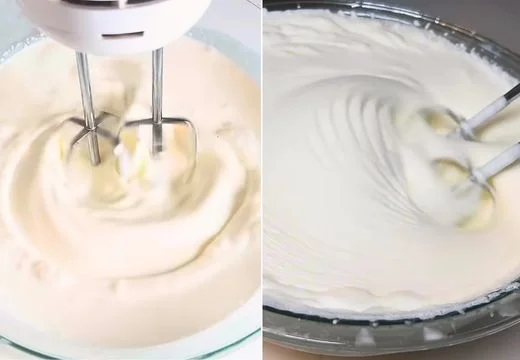
Step 2: Mix Until Whipped Cream Forms
Using a hand mixer, beat the cream on medium speed. A stand mixer or blender will also work if you do not have a hand mixer. After a few minutes, the cream will turn into thick whipped cream. Do not stop at this stage – keep mixing.
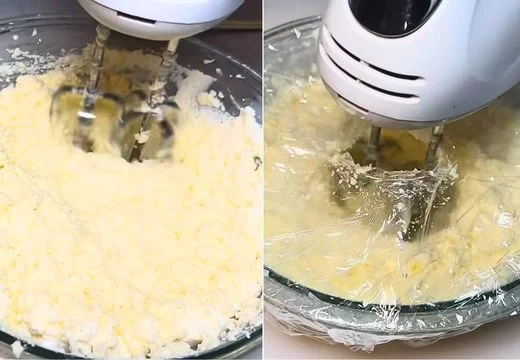
Step 3: Continue Mixing Until Butter Separates
After 5 to 10 minutes of continued mixing, the cream will begin separating into two distinct components: a yellow solid (the butter) and a milky liquid (the buttermilk). Keep mixing until the butter has fully separated. You can loosely cover the bowl with plastic wrap to prevent splashing.
Step 4: Strain the Buttermilk
Once the butter has fully formed, carefully strain the mixture over a bowl to separate the buttermilk from the solid butter. Save the buttermilk – it is excellent for baking biscuits, bread, pancakes, and cookies.
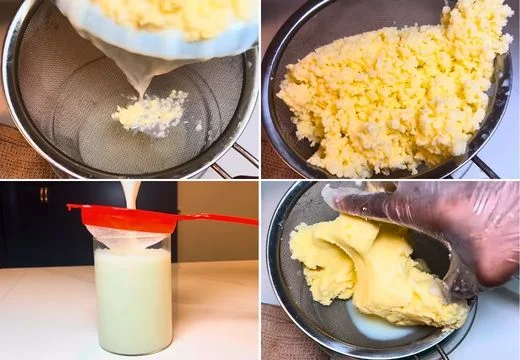
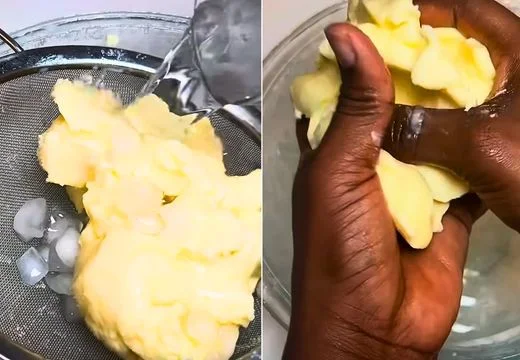
Step 5: Rinse the Butter Well
Transfer the butter to a clean bowl and rinse it thoroughly with cold water. Gently squeeze and press the butter to push out any remaining buttermilk. Repeat several times until the water runs completely clear. This step significantly extends the butter’s shelf life.
Step 6: Shape and Store
Shape the finished butter into a block, log, or any form you prefer.
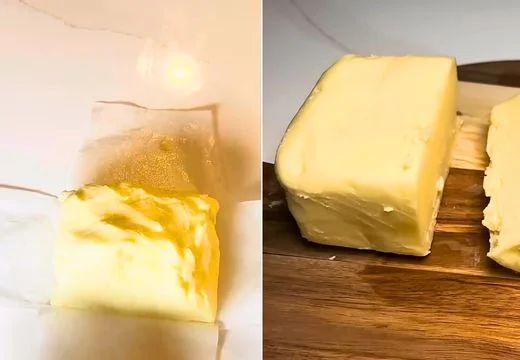
Transfer it to an airtight container and refrigerate or freeze until ready to use.
Customization and Serving Pairing Ideas
This homemade Outback Steakhouse butter is incredibly versatile – perfect for serving in dozens of creative ways beyond just spreading on bread. This recipe is versatile and easy to customize. Here are seven delicious ideas:
1. Classic Garlic Herb Butter
Transform this base into a knockout Outback Steakhouse garlic butter recipe by blending in 2–3 cloves of roasted garlic, fresh chopped parsley, and a pinch of black pepper. This variation is phenomenal melted over grilled steaks, sautéed mushrooms, or warm garlic bread. The roasted garlic adds a mellow sweetness that pairs beautifully with the natural creaminess of the butter.
2. Honey Cinnamon Butter
For a sweeter spin, mix in 1 tablespoon of raw honey and ¼ teaspoon of ground cinnamon. This sweet compound butter is incredible on warm cornbread, fluffy pancakes, waffles, or sweet potato toast. It channels that beloved steakhouse tradition of offering flavored butter alongside fresh rolls – only now you control every ingredient.
3. Smoked Paprika and Chive Butter
Fold in ½ teaspoon of smoked paprika and 1 tablespoon of finely sliced fresh chives for a vibrant, smoky compound butter. This version is outstanding as a finishing butter on grilled corn on the cob, roasted vegetables, or baked potatoes. The paprika adds warmth and a gorgeous color to the finished product.
4. Lemon Zest and Dill Butter
Add the zest of one lemon and 1 tablespoon of fresh dill to create a bright, herbaceous butter that pairs beautifully with seafood. Melt it over pan-seared salmon, shrimp, or grilled white fish for a restaurant-quality finish. It also works wonderfully stirred into warm pasta or spread over asparagus before roasting.
5. Blue Cheese Butter
Crumble 2 tablespoons of your favorite blue cheese into the finished outback butter, blending gently so small pockets of cheese remain throughout. This bold pairing is a natural match for ribeye steaks, beef burgers, and portobello mushrooms. The tang of the cheese cuts through the richness of the butter in the most satisfying way.
6. Truffle Butter
A few drops of high-quality truffle oil or a small amount of black truffle paste stirred into the base takes this simple recipe to fine dining territory. Use it to finish risotto, scrambled eggs, pasta, or a perfectly seared filet. Even a small amount delivers an unmistakably luxurious depth of flavor that transforms an everyday dish.
7. Brown Butter Spread
Before shaping and storing, gently warm a portion of the finished butter in a small saucepan over low heat until the milk solids turn golden and nutty-smelling. Allow it to cool slightly, then pour it back into the rest of the batch and chill. This toasted, nutty version is exceptional drizzled over roasted root vegetables, spread on banana bread, or used in cookie batters for a deeper, caramelized flavor.
Expert Cooking Tips for the Best Outback Steakhouse Butter Recipe
Mastering this Outback steakhouse garlic butter recipe and its many variations is easier when you know the professional tricks that make every batch turn out perfect. Follow these expert tips for perfect results every time:
1. Temperature Is Everything
Always start with very cold heavy cream – ideally straight from the refrigerator. Warm cream takes significantly longer to separate and often produces a softer, less structured butter. Chilling your mixing bowl and even your beaters beforehand creates the ideal environment for fast, efficient churning. In warm kitchens, place a bag of ice under your mixing bowl to maintain the cold temperature throughout the process.
2. Do Not Rush the Separation Stage
Many home cooks stop mixing when the cream looks like thick whipped cream and assume something has gone wrong when it does not turn into butter. This is completely normal. Push past the whipped stage and keep mixing steadily. Within a few more minutes, you will see and hear the mixture change dramatically – it will look slightly curdled, then suddenly break and reveal pale yellow butter solids surrounded by liquid buttermilk. Trust the process.
3. Rinse Thoroughly for Longer Shelf Life
The single most important step for preserving your homemade steakhouse butter is rinsing out every trace of buttermilk. Residual buttermilk causes butter to turn rancid much more quickly. Continue rinsing with fresh cold water, gently kneading the butter between your palms, until the water runs crystal clear. This can take 4–6 rounds of rinsing but it is absolutely worth the effort.
4. Use a Stand Mixer for Larger Batches
If you plan to make a large batch of outback butter for meal prepping, entertaining, or gifting, a stand mixer is your best friend. It handles the extended mixing time without fatigue and delivers consistent results. Keep the mixer covered with a clean kitchen towel during the final stages when the buttermilk begins to spray.
5. Salt at the Right Moment
Adding salt at the beginning – as this recipe instructs – seasons the butter evenly throughout. However, if you are making a flavored compound butter, taste after adding your herbs or extras before adding more salt. Many add-ins like blue cheese, truffle paste, or garlic already carry significant saltiness. Season gradually and taste as you go to avoid over-salting.
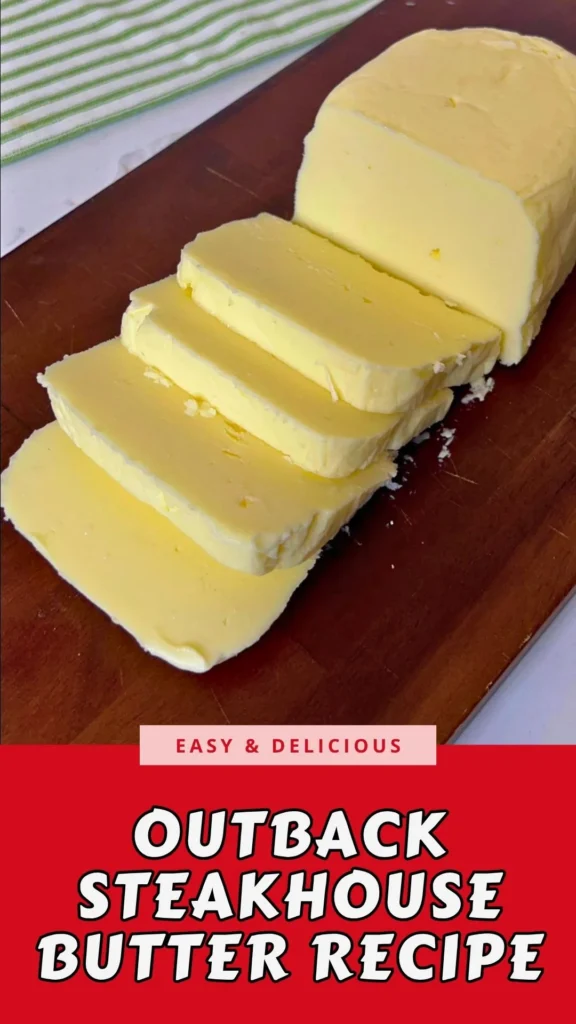
6. Shape and Chill for Professional Presentation
To achieve that classic restaurant-style look, roll your finished butter tightly in plastic wrap into a compact log shape, then refrigerate for at least 2 hours before slicing. When sliced into rounds, it presents beautifully on a plate or atop a hot steak – just like a high-end steakhouse would serve it. Silicone butter molds are another great option for individual portions.
7. Save Every Drop of Buttermilk
The byproduct of this process – fresh, homemade buttermilk – is a treasure in the kitchen. It is tangier and more flavorful than store-bought versions and works beautifully in buttermilk pancakes, Southern biscuits, quick breads, salad dressings, and marinades for fried chicken. Store it in a sealed jar in the refrigerator and use within 1–2 weeks.
Storage and Reheating Guidance
Store your homemade Outback Steakhouse butter in an airtight container or wrapped tightly in plastic wrap in the refrigerator for up to 3–4 weeks. For longer storage, freeze it for up to 6 months – slice into portions before freezing for easy use. To soften, simply leave it at room temperature for 15–20 minutes before serving. No reheating needed.
Outback Steakhouse Butter Recipe

If you have ever wondered what makes a steakhouse meal feel so indulgent and memorable, the answer often comes down to one thing – the butter. This Outback Steakhouse butter recipe recreates that rich, velvety, restaurant-quality butter right in your own kitchen using just two simple ingredients.
Ingredients
- 4 cups cold heavy cream
- ½ teaspoon salt
- Cold water
Instructions
Step 1: Chill the Bowl and Add Ingredients
Place your mixing bowl in the freezer for about 10 minutes. This helps the cream thicken faster and gives better results. Once chilled, pour 4 cups of cold heavy cream into the bowl and add ½ teaspoon salt.
Step 2: Mix Until Whipped Cream Forms
Using a hand mixer, beat the cream on medium speed. A stand mixer or blender will also work if you do not have a hand mixer. After a few minutes, the cream will turn into thick whipped cream. Do not stop at this stage – keep mixing.
Step 3: Continue Mixing Until Butter Separates
After 5 to 10 minutes of continued mixing, the cream will begin separating into two distinct components: a yellow solid (the butter) and a milky liquid (the buttermilk). Keep mixing until the butter has fully separated. You can loosely cover the bowl with plastic wrap to prevent splashing.
Step 4: Strain the Buttermilk
Once the butter has fully formed, carefully strain the mixture over a bowl to separate the buttermilk from the solid butter. Save the buttermilk – it is excellent for baking biscuits, bread, pancakes, and cookies.
Step 5: Rinse the Butter Well
Transfer the butter to a clean bowl and rinse it thoroughly with cold water. Gently squeeze and press the butter to push out any remaining buttermilk. Repeat several times until the water runs completely clear. This step significantly extends the butter’s shelf life.
Step 6: Shape and Store
Shape the finished butter into a block, log, or any form you prefer. Transfer it to an airtight container and refrigerate or freeze until ready to use.
Notes
Store your homemade Outback Steakhouse butter in an airtight container or wrapped tightly in plastic wrap in the refrigerator for up to 3–4 weeks. For longer storage, freeze it for up to 6 months – slice into portions before freezing for easy use. To soften, simply leave it at room temperature for 15–20 minutes before serving. No reheating needed.
Nutrition Information:
Yield:
8Serving Size:
1Amount Per Serving: Calories: 100
Common Queries and FAQs
When you give this Outback Steakhouse Butter Recipe a try, you might have a few questions. Don’t worry-we’ve rounded up answers to the most common ones to help you out.
What is Outback Steakhouse butter made of?
The classic Outback Steakhouse butter is made from heavy cream and salt – just two ingredients churned together until the cream separates into solid butter and liquid buttermilk. The result is a rich, fresh, and clean-tasting butter with a beautifully smooth texture that pairs perfectly with steaks, rolls, and vegetables.
Is this the same as the Outback Steakhouse garlic butter recipe?
The base recipe uses only cream and salt, which is the foundation of the famous Outback butter. To replicate the garlic butter version sometimes served at the restaurant, simply blend in roasted or minced garlic, fresh herbs like parsley, and a pinch of cracked black pepper after the butter has formed and been rinsed.
Why did my cream not turn into butter?
The most common reason is that the cream was not cold enough. Warm cream takes much longer to separate and may not firm up properly. Make sure you are using heavy cream with a fat content of at least 36%, and that both the cream and mixing bowl are thoroughly chilled before you begin. Keep mixing past the whipped cream stage – separation takes patience.
Can I make this recipe without a hand mixer?
Yes. A stand mixer works even better than a hand mixer for this recipe because it handles the extended mixing time without fatigue. A high-powered blender can also work, though it requires more careful monitoring. In a pinch, you can even shake the cream vigorously in a sealed mason jar – it just takes considerably more time and effort.
How long does homemade steakhouse butter last?
When properly rinsed to remove all buttermilk residue and stored in an airtight container in the refrigerator, homemade butter lasts 3–4 weeks. If frozen, it keeps well for up to 6 months without any noticeable loss of flavor or texture.
What can I do with the leftover buttermilk?
Homemade buttermilk is a wonderful baking ingredient. Use it in pancakes, waffles, Southern-style biscuits, quick breads, buttermilk salad dressings, or as a marinade for fried chicken or pork. It is tangier and fresher than store-bought versions, so use it within 1–2 weeks of making.
Can I add flavors to make a compound butter?
Absolutely. Once your butter is rinsed and shaped, you can blend in virtually any combination of herbs, spices, garlic, citrus zest, cheese, or sweet additions like honey and cinnamon. Compound butters are incredibly versatile and can be customized to complement any dish from grilled meats to baked goods.
This Outback Steakhouse butter recipe proves that the most satisfying flavors often come from the simplest ingredients. With just cold heavy cream and salt, you can create a batch of smooth, rich, restaurant-quality butter that tastes even better than anything you will find at a grocery store.
Whether you keep it classic or customize it into a bold compound butter, this recipe is endlessly versatile, surprisingly easy, and deeply rewarding to make. Try it this weekend – once you taste freshly made steakhouse butter straight from your own kitchen, you will never go back to the store-bought version again. Give it a go and enjoy every creamy, indulgent bite.
We’d love to hear how this recipe turns out for you! Give it a try, then drop a comment below to share your thoughts and tips with us. You can also follow us on Pinterest, and YouTube for more delicious updates and kitchen inspiration. Your feedback and support mean the world to us!