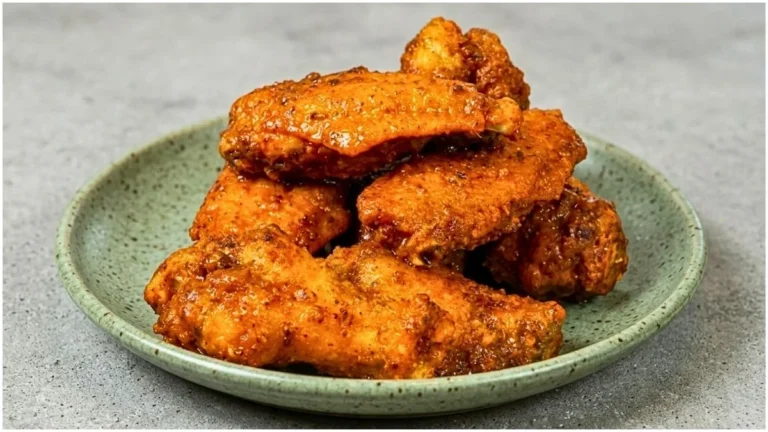
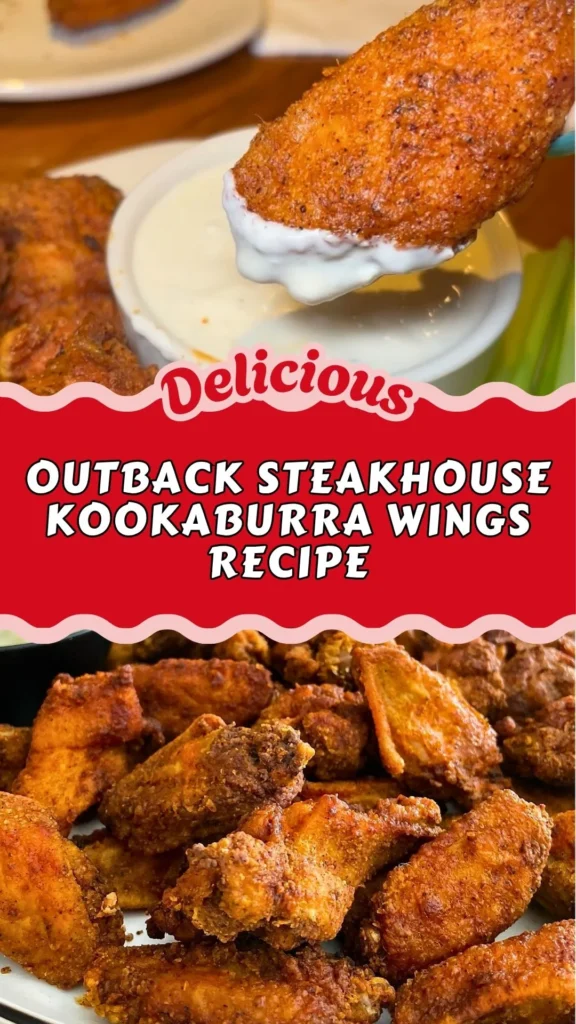
If you’ve ever sat down at Outback Steakhouse and ordered a plate of their legendary Kookaburra wings, you already know the craving is real. This outback steakhouse kookaburra wings recipe brings that same bold, crispy, saucy experience straight to your kitchen – no reservation required.
These wings are fried to golden perfection, tossed in a rich buttery hot sauce, and served alongside a creamy homemade blue cheese dressing that ties everything together.
Whether you’re planning a game-day spread, a family dinner, or simply chasing a restaurant-quality fix at home, this kookaburra wings recipe delivers every single time. Get ready – your new favorite wing night starts here.
What Does Outback Steakhouse Kookaburra Wings Taste Like?
Every bite of these outback steakhouse chicken wings hits you with a satisfying crunch that gives way to juicy, deeply seasoned meat inside.
The outer crust carries a warm, earthy depth from cumin and bouillon, while the buttery hot sauce wraps each wing in a tangy, mildly spicy glaze that isn’t overpowering.
The aroma alone – golden-fried chicken mingling with that savory, peppery sauce – is enough to pull everyone into the kitchen.
The cool, creamy blue cheese dressing on the side adds a sharp, tangy contrast that perfectly balances the heat and richness of every wing.
Outback Steakhouse Kookaburra Wings Recipe Ingredients
Gather all the following ingredients, before you start making this Outback Steakhouse Kookaburra Wings
For the Chicken Wings
- 2 pounds chicken wings, split into flats and drumettes
- 2 teaspoons all-purpose seasoning (or mix: 1 tsp salt + ½ tsp black pepper + ½ tsp garlic powder + ½ tsp onion powder)
- 2 teaspoons poultry seasoning
- 2 teaspoons ground cumin
- 2 teaspoons chicken bouillon powder
- 2 cups all-purpose flour
- Vegetable oil, for frying
For the Wing Sauce
- 2 tablespoons unsalted butter
- 1–2 teaspoons chicken bouillon powder
- ⅓ cup hot sauce
Homemade Blue Cheese Dressing
- ½ cup mayonnaise
- ½ cup sour cream
- 1 tablespoon buttermilk
- 1 teaspoon apple cider vinegar
- 1 teaspoon Worcestershire sauce
- ½ cup blue cheese crumbles
- ¼ teaspoon salt
- ¼ teaspoon black pepper
Kitchen Tools & Utensils
- Large mixing bowls (2)
- Medium mixing bowl (for blue cheese dressing)
- Deep pot or Dutch oven
- Kitchen thermometer (for oil and chicken)
- Wire rack set over a baking sheet
- Foil-lined baking tray
- Small saucepan
- Whisk
- Kitchen scissors
- Paper towels
- Tongs
Preparation & Cooking Time
Preparation Time: 30 minutes
Cooking Time: 20–25 minutes
Total Time: 55 minutes
Servings: 4
Copycat Outback Steakhouse Kookaburra Wings Recipe
Step 1: Clean and Prepare the Wings
Rinse the chicken wings under cold water, checking for any loose bone fragments or tough cartilage pieces. Trim if needed using kitchen scissors. Pat the wings completely dry with paper towels – removing all surface moisture is critical for a crispy fried coating.

Step 2: Season the Chicken
Place the dried wings into a large mixing bowl. Sprinkle on the all-purpose seasoning and poultry seasoning, then use your hands to massage the spices evenly into every wing. Allow the wings to rest for 10 to 15 minutes so the seasoning absorbs into the meat.
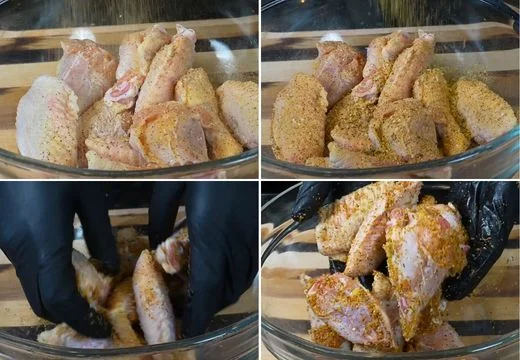
Step 3: Prepare the Seasoned Flour
In a separate large bowl, combine the all-purpose flour, ground cumin, chicken bouillon powder, poultry seasoning, and a little extra all-purpose seasoning. Whisk thoroughly until the spices are evenly distributed. This seasoned flour is the foundation of the signature crispy crust.

Step 4: Coat the Wings
Toss the seasoned wings into the flour mixture until every piece is fully and evenly coated. Shake off any excess flour, then arrange the wings on a foil-lined tray. Let them rest for 15 minutes – this sitting time helps the coating bond to the surface for a crispier result when fried.

Step 5: Make the Blue Cheese Dressing
While the wings rest, prepare the dressing. In a medium bowl, whisk together the mayonnaise, sour cream, buttermilk, apple cider vinegar, and Worcestershire sauce until smooth. Fold in the blue cheese crumbles and season with salt and black pepper. Refrigerate until serving time.

Step 6: Fry the Wings
Heat vegetable oil in a deep pot or Dutch oven to 350°F (175°C). Working in batches to avoid crowding, carefully lower the wings into the hot oil. Fry for 7 to 8 minutes, turning occasionally, until the wings are deep golden brown and the internal temperature reads at least 165°F. Transfer to a wire rack to drain and stay crispy.
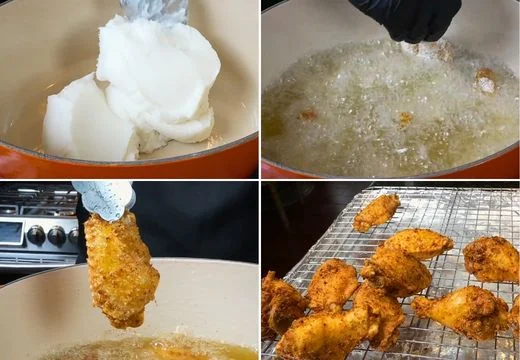
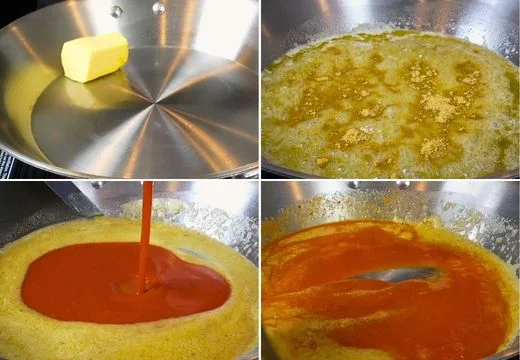
Step 7: Make the Wing Sauce
In a small saucepan over low heat, melt the butter. Stir in the chicken bouillon powder until fully dissolved, then add the hot sauce and whisk until the sauce is smooth and warm. Simmer gently for about one minute to let the flavors meld.
Step 8: Toss and Serve
Place all the hot fried wings into a large bowl. Pour the warm wing sauce over them and toss until every wing is evenly coated in that glossy, buttery glaze.

Serve immediately with the chilled blue cheese dressing on the side.
Customization & Serving Pairing Ideas for Outback Steakhouse Kookaburra Wings
The outback steakhouse kookaburra wings recipe is already a showstopper on its own, but half the fun of making wings at home is making them entirely your own. This recipe is incredibly versatile, whether you’re cooking for a crowd or tailoring each batch to different tastes at the table.
This recipe is versatile and easy to customize. Here are seven delicious ideas:
1. Swap the Hot Sauce for a Smoky BBQ Glaze
Instead of the buttery hot sauce, toss your fried wings in a smoky honey BBQ sauce. The sweet, caramelized notes pair beautifully with the cumin-forward crust and give you a completely different flavor profile without changing a single step of the cooking process.
2. Go Oven-Baked for a Lighter Version
Arrange the coated wings on a greased wire rack over a baking sheet and bake at 425°F for 40 to 45 minutes, flipping halfway through. You’ll still get a crispy exterior with significantly less oil – a great option when you want the same great flavor with a lighter feel.
3. Add a Honey Heat Drizzle
After tossing the wings in the hot sauce, finish with a drizzle of honey mixed with a pinch of cayenne. This simple touch elevates the wings into a sweet-heat combination that balances the richness of the butter perfectly.
4. Serve with Ranch Instead of Blue Cheese
If blue cheese isn’t your thing, a thick homemade buttermilk ranch dressing makes an equally satisfying dipping partner. The herby, creamy coolness still contrasts beautifully with the spiced, crispy wings.
5. Pair with Classic Steakhouse Sides
Lean into the Outback Steakhouse spirit by serving these wings alongside seasoned steak fries, creamy coleslaw, or a fresh wedge salad. The combination transforms your wing platter into a full steakhouse-style spread right at home.
6. Make It a Party Platter
Double or triple the batch and arrange the wings on a large platter with small dipping bowls of both blue cheese dressing and a honey mustard sauce. Add some celery and carrot sticks for crunch and color – ideal for game day or any gathering.

7. Try an Air Fryer Finish
Fry the wings just 5 to 6 minutes in oil, then finish them in the air fryer at 400°F for 4 to 5 minutes. This technique produces an ultra-crispy shell while keeping the inside incredibly moist – a great trick for achieving restaurant-quality texture at home.
Expert Cooking Tips for The Best Outback Steakhouse Kookaburra Wings Recipe
Getting the outback steakhouse wings recipe just right comes down to a few key techniques that separate good wings from truly great ones. The details matter – from how you dry the chicken to how you manage your frying oil temperature – and mastering each step ensures consistent, crave-worthy results every time.
Follow these expert tips for perfect results every time:
1. Dry the Wings Thoroughly Before Seasoning
Moisture is the enemy of a crispy crust. After rinsing, use multiple layers of paper towels and press firmly to remove as much surface water as possible. For maximum crispiness, place the dried wings uncovered in the refrigerator for 30 minutes before seasoning. This air-drying step creates the ideal surface for the flour coating to adhere.
2. Don’t Skip the Flour Resting Time
After coating the wings, letting them sit on the tray for 15 minutes isn’t optional – it’s what makes the crust stick. The flour absorbs some of the moisture from the chicken and firms up into a skin that won’t fall off in the fryer. Skipping this step often results in a patchy, thin coating.
3. Maintain Consistent Oil Temperature
Keep a thermometer in the oil throughout the entire frying process. Each batch of wings will lower the oil temperature. Allow the oil to return to 350°F between batches before adding the next. Frying in oil that’s too cool leads to greasy, soggy wings; too hot and the crust burns before the chicken cooks through.
4. Never Overcrowd the Pot
Frying too many wings at once drops the oil temperature sharply and traps steam, which leads to soft, un-crispy coating. Work in batches of 4 to 6 wings depending on your pot size. It takes more time, but the results are dramatically better.
5. Always Use a Wire Rack Instead of Paper Towels
Resting fried wings directly on paper towels traps steam underneath and softens the bottom crust within minutes. A wire rack allows airflow all around the wing, keeping the coating crispy from all sides while the excess oil drips away cleanly.
6. Season the Flour Generously
The flour mixture isn’t just a coating – it’s a significant part of the overall flavor. The bouillon powder, cumin, and poultry seasoning baked into that crust create a savory, aromatic base that carries through every bite even after being sauced. Don’t be shy with quantities here.
7. Make the Blue Cheese Dressing Ahead of Time
The dressing actually improves after an hour or two in the refrigerator. The flavors of the apple cider vinegar, Worcestershire, and blue cheese crumbles deepen and meld together as it chills. Preparing it before you start frying means one less thing to manage at serving time, and a noticeably better-tasting dip.
Storage & Reheating Guidance
Store leftover wings in an airtight container in the refrigerator for up to 3 days. For best results, reheat in the oven at 375°F for 10 to 12 minutes or in an air fryer at 400°F for 5 to 6 minutes to restore crispiness. Avoid microwaving, as it softens the coating. Store the blue cheese dressing separately in a sealed jar for up to 5 days.
Outback Steakhouse Kookaburra Wings Recipe

If you’ve ever sat down at Outback Steakhouse and ordered a plate of their legendary Kookaburra wings, you already know the craving is real. This outback steakhouse kookaburra wings recipe brings that same bold, crispy, saucy experience straight to your kitchen – no reservation required.
Ingredients
- 2 pounds chicken wings, split into flats and drumettes
- 2 teaspoons all-purpose seasoning
- 2 teaspoons poultry seasoning
- 2 teaspoons ground cumin
- 2 teaspoons chicken bouillon powder
- 2 cups all-purpose flour
- Vegetable oil, for frying
- 2 tablespoons unsalted butter
- 1–2 teaspoons chicken bouillon powder
- ⅓ cup hot sauce
- ½ cup mayonnaise
- ½ cup sour cream
- 1 tablespoon buttermilk
- 1 teaspoon apple cider vinegar
- 1 teaspoon Worcestershire sauce
- ½ cup blue cheese crumbles
- ¼ teaspoon salt
- ¼ teaspoon black pepper
Instructions
Step 1: Clean and Prepare the Wings
Rinse the chicken wings under cold water, checking for any loose bone fragments or tough cartilage pieces. Trim if needed using kitchen scissors. Pat the wings completely dry with paper towels – removing all surface moisture is critical for a crispy fried coating.
Step 2: Season the Chicken
Place the dried wings into a large mixing bowl. Sprinkle on the all-purpose seasoning and poultry seasoning, then use your hands to massage the spices evenly into every wing. Allow the wings to rest for 10 to 15 minutes so the seasoning absorbs into the meat.
Step 3: Prepare the Seasoned Flour
In a separate large bowl, combine the all-purpose flour, ground cumin, chicken bouillon powder, poultry seasoning, and a little extra all-purpose seasoning. Whisk thoroughly until the spices are evenly distributed. This seasoned flour is the foundation of the signature crispy crust.
Step 4: Coat the Wings
Toss the seasoned wings into the flour mixture until every piece is fully and evenly coated. Shake off any excess flour, then arrange the wings on a foil-lined tray. Let them rest for 15 minutes – this sitting time helps the coating bond to the surface for a crispier result when fried.
Step 5: Make the Blue Cheese Dressing
While the wings rest, prepare the dressing. In a medium bowl, whisk together the mayonnaise, sour cream, buttermilk, apple cider vinegar, and Worcestershire sauce until smooth. Fold in the blue cheese crumbles and season with salt and black pepper. Refrigerate until serving time.
Step 6: Fry the Wings
Heat vegetable oil in a deep pot or Dutch oven to 350°F (175°C). Working in batches to avoid crowding, carefully lower the wings into the hot oil. Fry for 7 to 8 minutes, turning occasionally, until the wings are deep golden brown and the internal temperature reads at least 165°F. Transfer to a wire rack to drain and stay crispy.
Step 7: Make the Wing Sauce
In a small saucepan over low heat, melt the butter. Stir in the chicken bouillon powder until fully dissolved, then add the hot sauce and whisk until the sauce is smooth and warm. Simmer gently for about one minute to let the flavors meld.
Step 8: Toss and Serve
Place all the hot fried wings into a large bowl. Pour the warm wing sauce over them and toss until every wing is evenly coated in that glossy, buttery glaze. Serve immediately with the chilled blue cheese dressing on the side.
Notes
Store leftover wings in an airtight container in the refrigerator for up to 3 days. For best results, reheat in the oven at 375°F for 10 to 12 minutes or in an air fryer at 400°F for 5 to 6 minutes to restore crispiness. Avoid microwaving, as it softens the coating. Store the blue cheese dressing separately in a sealed jar for up to 5 days.
Nutrition Information:
Yield:
4Serving Size:
1Amount Per Serving: Calories: 400
Common Queries & FAQs
When you give this Outback Steakhouse Kookaburra Wings Recipe a try, you might have a few questions. Don’t worry-we’ve rounded up answers to the most common ones to help you out.
What makes Outback Steakhouse Kookaburra wings different from regular chicken wings?
The Kookaburra wings stand out because of their deeply seasoned flour coating – built with cumin, poultry seasoning, and chicken bouillon – which creates a thicker, crunchier, and more flavorful crust than a standard wing. The finishing sauce, enriched with butter and bouillon, adds a richness that typical hot wing sauces don’t have.
Can I use an air fryer instead of deep frying for this kookaburra wings recipe?
Yes, absolutely. Preheat your air fryer to 400°F and cook the coated wings in a single layer for 20–22 minutes, flipping halfway through. Spray generously with cooking oil before air frying. The result won’t be quite as deeply golden as deep-frying, but you’ll still get a satisfyingly crispy wing.
What hot sauce does Outback Steakhouse use in their wings?
Outback Steakhouse does not publicly disclose their exact hot sauce brand, but most culinary experts and food bloggers who have recreated the outback steakhouse kookaburra wings at home agree that a classic Louisiana-style hot sauce like Frank’s RedHot or Crystal Hot Sauce delivers the closest flavor profile.
How do I keep fried wings crispy after cooking?
The key is to rest them on a wire rack immediately after frying, never stacking them, and to sauce them just before serving. You can also keep fried (unsauced) wings warm and crispy in an oven set to 200°F on a wire rack while you fry remaining batches.
Can I make this outback steakhouse wings recipe gluten-free?
Yes. Substitute the all-purpose flour with a gluten-free 1:1 baking flour blend or rice flour. Rice flour, in particular, produces an exceptionally light, crispy coating that many home cooks actually prefer over traditional wheat flour.
Is it possible to marinate the wings before cooking?
While this recipe doesn’t include a wet marinade, you can marinate the wings in buttermilk for 2–4 hours before the seasoning step. Buttermilk tenderizes the meat and helps the flour coating adhere even better, resulting in an extra-thick, ultra-crispy crust.
What’s the best oil for frying chicken wings?
Vegetable oil is the go-to for this recipe due to its neutral flavor and high smoke point. Peanut oil is an excellent alternative, as it imparts a very subtle, slightly nutty flavor that complements the savory wing coating beautifully. Avoid olive oil, which has too low a smoke point for deep frying.
This outback steakhouse kookaburra wings recipe is proof that some of the best restaurant food can be recreated – and even improved – right in your own kitchen. With a boldly seasoned crispy coating, a rich buttery wing sauce, and a homemade blue cheese dressing that pulls it all together, every bite delivers exactly what you’re craving.
Whether it’s your first time making homemade wings or you’re a seasoned home cook looking for a go-to crowd-pleaser, this recipe is worth every step. Give it a try, make it your own, and don’t forget to share it with someone who deserves a great meal.
We’d love to hear how this recipe turns out for you! Give it a try, then drop a comment below to share your thoughts and tips with us. You can also follow us on Pinterest, and YouTube for more delicious updates and kitchen inspiration. Your feedback and support mean the world to us!