
If you’ve ever sat down at Outback Steakhouse and ordered a bowl of their legendary Tasmanian chili, you already know it’s unlike anything else on the menu.
Rich, hearty, and deeply satisfying, the outback steakhouse tasmanian chili recipe has earned a devoted following for one simple reason – it’s built on real, slow-simmered beef, bold spices, and a depth of flavor that store-bought chili can never replicate.
Now you can make this iconic dish from scratch, right in your own kitchen. This copycat recipe captures everything that makes the original so irresistible: tender chunks of chuck roast, fire-roasted tomatoes, aromatic vegetables, and a perfectly balanced spice blend that warms you from the inside out.
Whether it’s a cold weeknight dinner or a weekend gathering, this recipe delivers.
What Does Outback Steakhouse Tasmanian Chili Taste Like?
The outback tasmanian chili is a bold, full-bodied experience from the very first spoonful. Unlike ground-beef chilis, this version uses cubed chuck roast that slowly breaks down into fork-tender, melt-in-your-mouth morsels soaked in a deeply savory broth.

The fire-roasted tomatoes add a subtle smokiness, while the jalapeño and cayenne bring a slow, building heat that never overwhelms. Underneath it all, the cumin and chili powder create an earthy, warm backbone that feels both rustic and refined.
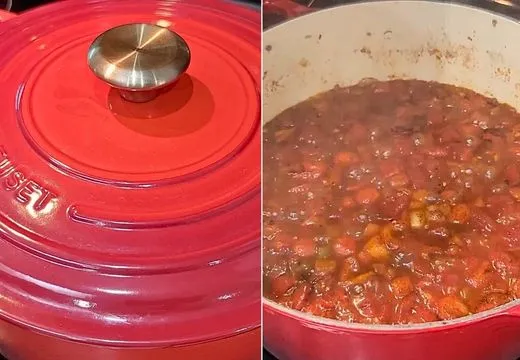
The aroma alone – garlic sizzling with peppers and onion, spices blooming in a hot Dutch oven – is enough to draw everyone into the kitchen. Topped with creamy, melty Colby Jack cheese and fresh green onions, each bowl is a textural contrast of silky broth, tender beef, and cool, fresh toppings.
Outback Steakhouse Tasmanian Chili Recipe Ingredients
Gather all the following ingredients, before you start making this Outback Steakhouse Tasmanian Chili
For the Chili:
- 2½ pounds chuck roast, trimmed and cut into bite-sized cubes
- 2 tablespoons neutral cooking oil (vegetable, canola, or avocado oil)
- 3 cloves garlic, minced (about 1 tablespoon)
- 1 medium red bell pepper, diced
- 1 medium yellow or white onion, diced
- 1 jalapeño pepper, seeded and diced
- 2 tablespoons tomato paste
- 1 (28-ounce) can fire-roasted diced tomatoes, undrained
- 2 cups beef stock
Seasonings:
- 2 tablespoons chili powder
- 1 tablespoon ground cumin
- 1 teaspoon paprika
- ½ teaspoon cayenne pepper
- 1 teaspoon kosher salt, or to taste
- ½ teaspoon black pepper, or to taste
Optional Toppings:
- 1 cup shredded Colby Jack cheese
- 2 green onions, thinly sliced
Kitchen Tools & Utensils List
- Large enameled Dutch oven or heavy-bottomed pot with a lid
- Sharp chef’s knife and cutting board
- Wooden spoon or heat-resistant silicone spatula
- Measuring spoons and cups
- Ladle for serving
- Small prep bowls for organized mise en place
Preparation and Cooking Time
Preparation Time: 20 minutes
Cooking Time: 2 hours 30 minutes
Total Time: 2 hours 50 minutes
Servings: 6
Copycat Outback Steakhouse Tasmanian Chili Recipe
Follow these clear, straightforward steps from start to finish – each stage builds on the last to develop maximum flavor, so take your time and enjoy the process.
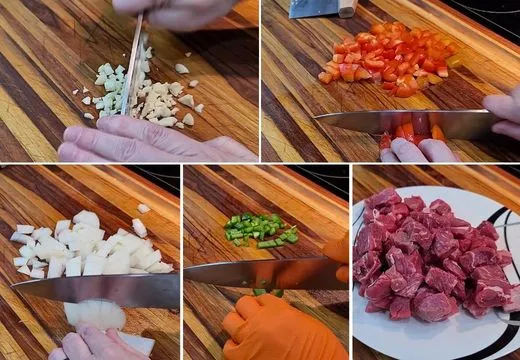
Step 1: Preparing the Ingredients
Dice the chuck roast into bite-sized pieces, removing any hard fat while keeping the soft fat that will render and add richness during cooking. Dice the red bell pepper, onion, and jalapeño (after removing seeds and veins) into similar medium-sized pieces so everything cooks evenly. Mince the garlic and set all the prepared ingredients aside before you heat the pot.
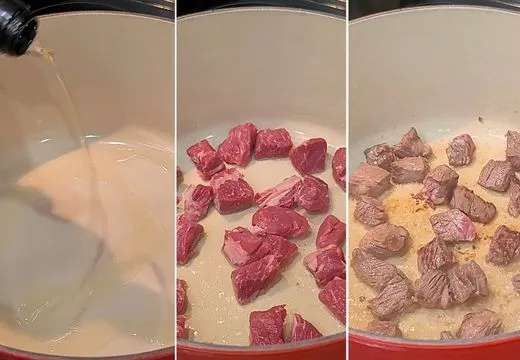
Step 2: Searing the Beef
Heat 2 to 3 tablespoons of neutral oil in a large enameled Dutch oven over medium-high heat until the oil is hot and shimmering. Sear the beef cubes in batches without crowding the pan, browning them on all sides to develop a deep, caramelized crust. Remove each batch as it is done and set aside. The beef will not be fully cooked at this stage – that happens during the long simmer.
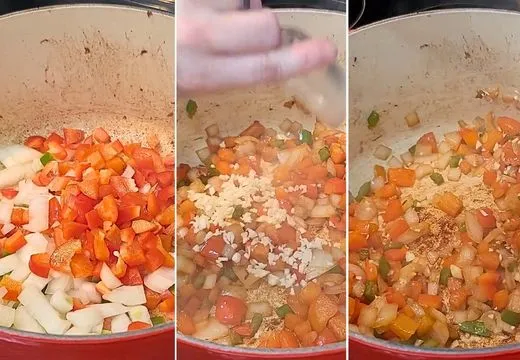
Step 3: Cooking the Vegetables
In the same pot, add the diced red bell pepper and onion. Sauté them for about 5 minutes until they begin to soften and take on a little color, adding a splash more oil if the pan seems dry. Once the vegetables are softening nicely, add the minced garlic and stir continuously for 30 seconds until fragrant. Don’t rush this step – softened aromatics form the flavor foundation of the entire chili.
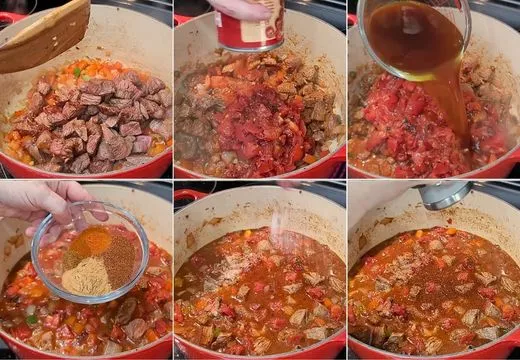
Step 4: Combining and Seasoning
Return the seared beef cubes and any collected juices back into the pot. Stir in the tomato paste and mix everything well so the meat and vegetables are evenly coated. Add the undrained fire-roasted tomatoes, beef stock, chili powder, ground cumin, paprika, cayenne pepper, and salt and black pepper to taste. Stir thoroughly to distribute all the spices throughout the mixture.
Step 5: Simmering the Chili
Bring the mixture to a boil, then reduce the heat to the lowest setting. Cover the pot with a lid and simmer gently for 2 to 2½ hours, stirring occasionally every 30 minutes or so to prevent sticking. Continue cooking until the meat is very soft and completely tender. Taste the chili near the end of cooking and adjust salt and pepper if needed.
Step 6: Serving
Ladle the hot chili into bowls. Top each serving generously with shredded Colby Jack cheese and chopped green onions.

Serve immediately for the best flavor and texture experience.
Customization & Serving Pairing Ideas for Outback Steakhouse Tasmanian Chili
The outback tasmanian chili is one of those recipes that rewards a little creativity – whether you’re feeding a crowd, adjusting for dietary preferences, or simply using what’s in your pantry, there are plenty of ways to make it your own.
This recipe is versatile and easy to customize. Here are seven delicious ideas:
1. Add kidney or black beans
The original Outback chili is a no-bean chili, but if you prefer a heartier, more traditional American-style bowl, stir in one drained can of kidney beans or black beans during the last 30 minutes of simmering. They absorb the rich broth beautifully and add plant-based protein.
2. Swap the protein
Chuck roast is ideal, but bone-in short ribs work magnificently here – the marrow enriches the broth with an almost silky finish. For a lighter version, cubed venison or lamb shoulder are excellent choices that complement the bold spice profile.
3. Adjust the heat level
For a milder chili, skip the jalapeño and reduce the cayenne to a pinch. For heat lovers, add a second jalapeño with seeds intact, or stir in a teaspoon of chipotle in adobo sauce for a smoky, fiery depth.
4. Serve over baked potatoes
Load the chili over a fluffy, split baked russet potato for a complete, restaurant-style meal that’s endlessly satisfying on a cold evening. This presentation mirrors many Outback menu combinations.
5. Make it a chili cheese dip
Stir the finished chili with cream cheese and shredded cheddar over low heat until smooth and creamy, then serve warm as a party dip alongside tortilla chips or crusty bread slices.
6. Top it creatively
Beyond Colby Jack and green onions, try a dollop of sour cream, pickled red onions, fresh cilantro, sliced avocado, or a drizzle of hot sauce to personalize each bowl at the table.

7. Pair with Outback-inspired sides
Serve the outback chili recipe alongside warm cornbread, a wedge salad with blue cheese dressing, or buttery garlic bread to recreate the full steakhouse experience at home.
Expert Cooking Tips for the Perfect Outback Tasmanian Chili Recipe
Nailing the tasmanian chili outback flavor at home comes down to a handful of professional techniques that elevate an already great recipe into something truly unforgettable.
Follow these expert tips for perfect results every time:
1. Choose well-marbled chuck roast
The fat content in chuck roast is what gives this chili its signature richness. Look for a piece with visible fat running through the meat – not just around the edges. That intramuscular fat slowly renders during the long simmer, basting the beef from within and creating extraordinarily tender bites.
2. Never skip the sear
Browning the beef before building the chili is a non-negotiable step. The Maillard reaction creates hundreds of new flavor compounds on the surface of the meat that will dissolve into the broth during simmering. A pale, grey sear is wasted effort – you want a rich, mahogany-brown crust on every side.
3. Sear in batches, always
Crowding the pan drops the oil temperature and causes the meat to steam rather than brown. Work in batches of no more than one layer at a time, giving each piece space to make full contact with the hot pan surface. Patience here pays enormous dividends in flavor.
4. Bloom your spices
After stirring in the tomato paste and before adding the liquid, let the spices cook in the oil and paste for 60 to 90 seconds. This brief blooming step activates the fat-soluble compounds in chili powder, cumin, and paprika, dramatically amplifying their depth and complexity.
5. Use fire-roasted tomatoes, not regular
The charred, smoky notes in fire-roasted diced tomatoes are a critical part of what makes the outback steakhouse tasmanian chili taste distinctive. Regular diced tomatoes produce a noticeably flatter, more acidic result. This is one ingredient worth seeking out specifically.
6. Simmer low and slow without rushing
Two to two-and-a-half hours at the lowest possible heat is what transforms tough chuck roast into spoon-tender meat. A hard boil will tighten the muscle fibers and make the beef chewy. Low and slow is the entire philosophy of great chili cookery.
7. Rest before serving
Like all braised dishes, this chili improves significantly after resting. If you can make it a day ahead and refrigerate overnight, the flavors meld together into something noticeably more harmonious. Skim any solidified fat from the surface before reheating gently on the stovetop.
Storage & Reheating Guidance
Store leftover chili in an airtight container in the refrigerator for up to 4 days, or freeze in portion-sized containers for up to 3 months. Reheat gently on the stovetop over medium-low heat, adding a splash of beef stock or water to loosen the consistency. Avoid boiling during reheating to keep the beef tender. Add fresh toppings after reheating.
Outback Steakhouse Tasmanian Chili Recipe

If you’ve ever sat down at Outback Steakhouse and ordered a bowl of their legendary Tasmanian chili, you already know it’s unlike anything else on the menu. Rich, hearty, and deeply satisfying, the outback steakhouse tasmanian chili recipe has earned a devoted following for one simple reason – it’s built on real, slow-simmered beef, bold spices, and a depth of flavor that store-bought chili can never replicate.
Ingredients
- 2½ pounds chuck roast, trimmed and cut into bite-sized cubes
- 2 tablespoons neutral cooking oil
- 3 cloves garlic, minced
- 1 medium red bell pepper, diced
- 1 medium yellow or white onion, diced
- 1 jalapeño pepper, seeded and diced
- 2 tablespoons tomato paste
- 1 (28-ounce) can fire-roasted diced tomatoes, undrained
- 2 cups beef stock
- 2 tablespoons chili powder
- 1 tablespoon ground cumin
- 1 teaspoon paprika
- ½ teaspoon cayenne pepper
- 1 teaspoon kosher salt, or to taste
- ½ teaspoon black pepper, or to taste
- 1 cup shredded Colby Jack cheese
- 2 green onions, thinly sliced
Instructions
Step 1: Preparing the Ingredients
Dice the chuck roast into bite-sized pieces, removing any hard fat while keeping the soft fat that will render and add richness during cooking. Dice the red bell pepper, onion, and jalapeño (after removing seeds and veins) into similar medium-sized pieces so everything cooks evenly. Mince the garlic and set all the prepared ingredients aside before you heat the pot.
Step 2: Searing the Beef
Heat 2 to 3 tablespoons of neutral oil in a large enameled Dutch oven over medium-high heat until the oil is hot and shimmering. Sear the beef cubes in batches without crowding the pan, browning them on all sides to develop a deep, caramelized crust. Remove each batch as it is done and set aside. The beef will not be fully cooked at this stage – that happens during the long simmer.
Step 3: Cooking the Vegetables
In the same pot, add the diced red bell pepper and onion. Sauté them for about 5 minutes until they begin to soften and take on a little color, adding a splash more oil if the pan seems dry. Once the vegetables are softening nicely, add the minced garlic and stir continuously for 30 seconds until fragrant. Don’t rush this step – softened aromatics form the flavor foundation of the entire chili.
Step 4: Combining and Seasoning
Return the seared beef cubes and any collected juices back into the pot. Stir in the tomato paste and mix everything well so the meat and vegetables are evenly coated. Add the undrained fire-roasted tomatoes, beef stock, chili powder, ground cumin, paprika, cayenne pepper, and salt and black pepper to taste. Stir thoroughly to distribute all the spices throughout the mixture.
Step 5: Simmering the Chili
Bring the mixture to a boil, then reduce the heat to the lowest setting. Cover the pot with a lid and simmer gently for 2 to 2½ hours, stirring occasionally every 30 minutes or so to prevent sticking. Continue cooking until the meat is very soft and completely tender. Taste the chili near the end of cooking and adjust salt and pepper if needed.
Step 6: Serving
Ladle the hot chili into bowls. Top each serving generously with shredded Colby Jack cheese and chopped green onions. Serve immediately for the best flavor and texture experience.
Notes
Store leftover chili in an airtight container in the refrigerator for up to 4 days, or freeze in portion-sized containers for up to 3 months. Reheat gently on the stovetop over medium-low heat, adding a splash of beef stock or water to loosen the consistency. Avoid boiling during reheating to keep the beef tender. Add fresh toppings after reheating.
Nutrition Information:
Yield:
6Serving Size:
1Amount Per Serving: Calories: 300
Common Queries and FAQs
When you give this Outback Steakhouse Tasmanian Chili Recipe a try, you might have a few questions. Don’t worry-we’ve rounded up answers to the most common ones to help you out.
What makes Outback Steakhouse Tasmanian chili different from regular chili?
The key difference is the protein – instead of ground beef, the Tasmanian chili uses chunked chuck roast that slow-simmers until fork-tender. This gives it a meatier, more substantial texture and a richer, deeper flavor profile that sets it apart from most home-style chilis.
Does the Outback Tasmanian chili have beans?
No, the original outback tasmanian chili is a no-bean chili, meaning it is built entirely around the beef, vegetables, and a robust spice blend. This follows the Texas-style chili tradition of letting the meat and seasoning take center stage without the addition of legumes.
Can I make this chili in a slow cooker or Crockpot?
Yes. Complete Steps 1 through 4 on the stovetop – searing the beef and sautéing the aromatics are essential for flavor development. Then transfer everything into a slow cooker and cook on LOW for 7 to 8 hours or HIGH for 4 to 5 hours until the beef is completely tender.
What cut of beef works best for this recipe?
Chuck roast is the ideal cut because its high collagen and fat content break down beautifully during long, slow cooking. Beef brisket or bone-in short ribs are worthy alternatives. Avoid lean cuts like sirloin or round roast, as they tend to dry out during extended simmering.
How do I thicken the chili if it’s too thin?
Remove the lid during the last 20 to 30 minutes of simmering to allow excess liquid to evaporate naturally. Alternatively, mash a small portion of the softened beef and vegetables against the side of the pot and stir it back in – this adds body without the need for any thickening agents.
Is the Outback chili recipe spicy?
It carries a moderate, pleasant heat from the jalapeño and cayenne pepper. It’s noticeable but not aggressive, making it approachable for most palates. You can easily dial the heat up or down by adjusting the cayenne and jalapeño quantities to match your personal preference.
Can I use canned beef or pre-cooked meat to save time?
It is not recommended. The searing and slow-simmering process is what develops the complex, layered flavor that defines the outback chili recipe. Pre-cooked or canned meat bypasses the critical browning and braising stages, resulting in a noticeably shallower, less satisfying final dish.
This outback steakhouse tasmanian chili recipe is proof that the most satisfying restaurant meals are absolutely achievable at home – often better, because you control every ingredient and every layer of flavor.
From the seared chuck roast to the bloom of warm spices and the long, patient simmer, every step builds toward something deeply nourishing and genuinely delicious. Make it once, and it will earn a permanent spot in your cold-weather recipe rotation. Now fire up that Dutch oven and get cooking – your best bowl of chili is waiting.
We’d love to hear how this recipe turns out for you! Give it a try, then drop a comment below to share your thoughts and tips with us. You can also follow us on Pinterest, and YouTube for more delicious updates and kitchen inspiration. Your feedback and support mean the world to us!